


Did you know that you could easily make ladyfingers from scratch? And you don’t even need so many ingredients: just eggs, flour and sugar! That’s it! I think most of us are so used to commercial ones that it doesn’t even occur to us that homemade ladyfingers are actually possible! But today we’re going to see just how easily and quickly you can make them yourself!

What Are Ladyfingers?
You are probably already familiar with ladyfingers, these long, narrow cookies that are shaped like fingers. They can be found in tiramisu, soaked in coffee. Or you might have noticed them in trifles. Tomorrow, we will see together how to use them to make a charlotte cake.
Homemade ladyfingers have a crisp shell and are soft on the inside, unlike commercial ones which are dry throughout. They are baked at a high temperature for a short period of time, giving this nice textural contrast. The longer you bake them, the drier they become.
Mixing Ladyfinger Batter
To get the soft and airy interior, ladyfingers are made using the separated egg sponge method1. The whole eggs are separated into the whites and yolks. The egg whites and sugar are whipped until medium peaks form. The egg yolks are then mixed into the egg white foam. And finally, the sifted dry ingredients are gently folded in.
Let’s take a closer look at the three components:
- Egg whites + sugar
- Egg yolks
- Dry ingredients (flour)
Beating the egg whites
The airy texture of the ladyfingers is a result of all the air incorporated when whipping the egg whites. It’s important to pay close attention to the eggs when you are beating them. We will dive deeper into meringues (egg white foam stabilized with sugar) in the future but for now, there are a few things you should keep in mind.
- Use room temperature eggs. Ideally, the temperature of the eggs should be around 15°C (59°F) to 20°C (68°F).
- Make sure there is no egg yolk. As tempting as it is, don’t crack your eggs straight into the mixing bowl. If you spill some egg yolk by accident, you might have to throw everything away! Separate the eggs into smaller bowls and only add the egg whites to the mixing bowl if they are completely free of egg yolks.
- Start slow. Don’t crank up the speed from the beginning. Start on low speed and then gradually increase it to medium-high speed.
- Don’t add the sugar from the beginning. It will interfere with the air bubble formation and your meringue won’t be as airy. You should first beat the egg whites until foamy and then you can start adding the sugar slowly.
- Don’t add the sugar in one go. Adding it in one go will weigh down and deflate the foam created. Add one tablespoon at a time to give the sugar a chance to dissolve before adding more.
- Keep a close eye. Don’t try to multitask. You don’t want to end up overbeating the eggs.
When should you stop beating the egg whites?
You should stop beating the egg whites when medium peaks form. To know if you’re there, lift the whisk up. If the meringue holds onto the whisk and forms a peak that tilts slightly, you’re good. If it doesn’t hold its shape, keep beating.
Once this step is done, it’s time to add the egg yolks.

Should the egg yolks be mixed first?
You can either simply beat the yolks with a fork for a few seconds before adding them to the egg whites. Or for a lighter cookie, you can whip them with part of the sugar until the ribbon stage: when you lift the whisk up over the bowl, the batter will fall back slowly in a ribbon and won’t disappear immediately into the rest of the batter. The mixture will look thicker, creamier and lighter in color. You’ll also notice that the volume has increased due to the air incorporated during mixing.
What method to use depends on your preferences and what texture you are looking for. I personally find that adding the egg yolks straight into the egg white foam is much simpler and less time consuming. Once you add the egg yolks, you should only beat for a few seconds until combined. You don’t want to deflate the egg white foam.
Adding The Dry Ingredients
Once all the eggs have been mixed together, you should add the flour. Time to switch to a spatula or a large metal spoon to avoid deflating the mixture. Mix only as much as needed and fill your piping bag fitted with a large, round tip.
If you just want to make a disk and not the finger shape, you can skip the piping bag if you prefer. Simply empty some of the batter onto a baking sheet lined with parchment paper and flatten it gently with an offset spatula to get an even layer. I know I keep saying this but again, you don’t want to deflate the batter so don’t flatten it too much.
Okay, how about some step-by-step pictures now?
Making Ladyfingers
Whipping the egg whites
- In a large mixing bowl, whip the egg whites on low speed until foamy.
- Start adding the sugar one tablespoon at a time and gradually increase the speed to medium-high.


- Stop whipping when you get to medium peaks that hold their shape but slightly tilt at the top.


Adding the egg yolks and flour
- Slightly beat the egg yolks with a fork (I always forget!) and add them to the whipped egg whites in one go. Beat on low speed for 1-2 seconds, just until combined.
- Sift the flour over the egg mixture and fold in gently using a spatula. Be careful not to deflate the batter.


Piping The Batter
Okay, this is where it gets slightly trickier, especially if you are not a fan of piping bags. But don’t worry! We’re going to draw some templates to make this piping step much easier!
There are a few ways to pipe the sponge cake batter. This post is about ladyfingers, so we’ll talk first about how to pipe the individual finger shapes. But since we will be making a French charlotte cake this week, I will show you next time what to do to avoid any cream leakage.
Ladyfingers
Let’s prepare the template.
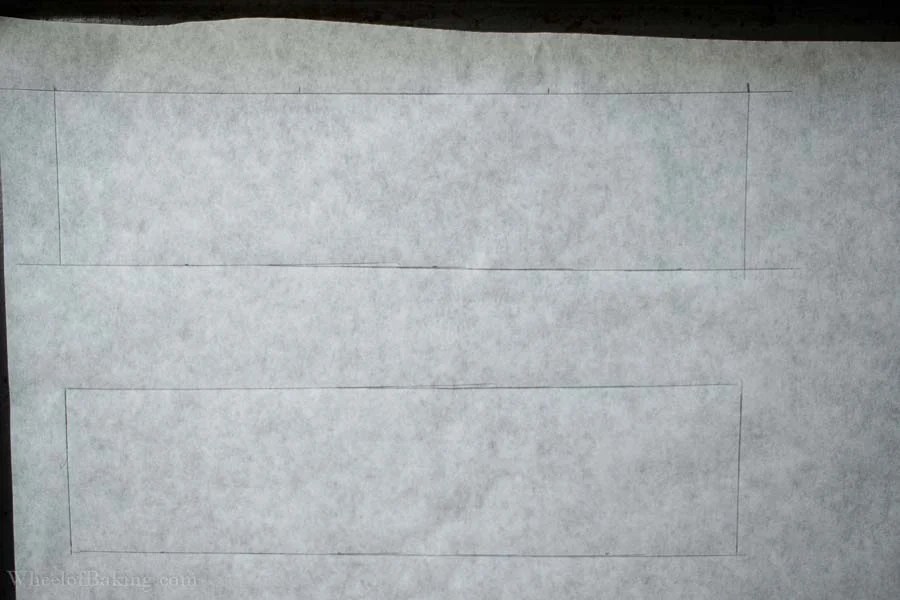
You have to draw two parallel lines at the top of the parchment paper. How far apart the lines should be will depend on how long you want your ladyfingers to be. You could space the lines by 7.5cm (3 inches) for example.
You can draw more sets of parallel lines on the same parchment paper if you want. It should be possible to fit about 3 sets. The ladyfingers will spread a little during baking so leave a gap of at least 2.5cm (1 inch) between the different sets. And also between the ladyfingers within the same set.
Charlotte
If you are following the baking calendar, then you could pipe the batter slightly differently for the charlotte cake we will be making. You could pipe:
- Individual ladyfingers as explained previously. When it’s time to fill the cake with cream, you might notice that some of it has leaked to the sides. If you don’t like this, then the next point is more suitable for you.
- Individual ladyfingers that are much closer together, about 1mm apart only. Why? Once they bake, they will form one layer that you can fold and wrap around the cake. If folded properly, this will prevent leakage. We’ll do this together so you have a better understanding of how it works.
- Disks: You will use these for the bottom of the cake and the middle if desired. They should be about 2cm less than the size of your pan since you will have placed ladyfingers upright all around the edges as well.
Baking The Ladyfingers
Now that you’ve piped the ladyfingers, it’s almost time to bake them!
- Sift icing sugar over the cookies and let them sit at room temperature for about 15 minutes. The icing sugar will dissolve into the ladyfingers.
- In the meantime, start preheating the oven to 200°C (392°F, conventional setting).
- Sift icing sugar over the ladyfingers one more time just before baking them to get a nice sugary crust.
You might be wondering why you have to wait 15 minutes before baking them. After all, we’re told that batters made with egg foam should go straight into the oven before they deflate. Well, this is true, but 15 minutes isn’t so long. And giving time for the sugar to dissolve on the surface of the ladyfinger, before dusting some more will give you an amazing crust.

The ladyfinger in the top left corner was dusted twice with icing sugar at a 15 minute interval, unlike the other ladyfingers (5 minute interval). The icing sugar dissolved properly and the ladyfinger had a very nice sweet crust.
- Place the rack in the bottom third of the oven (level 2 out of 5 for example) and bake for 9-10 minutes. The ladyfingers should have a light golden color and shouldn’t stick to your finger.
- Let them cool for a minute and transfer the ladyfingers to a wire rack. Use an offset spatula to release them from the parchment paper if needed.


And that’s it! Super easy, isn’t it? You can eat them right away if you want! Or you can save them to make a strawberry charlotte cake with me tomorrow!
In case you missed it, head over to the crème Anglaise baking calendar to see what we’ll be learning this month.

Homemade Ladyfingers
26
ladyfingers10
minutes10
minutesCrisp on the outside with a soft and spongy interior, ladyfingers soak up and retain flavor incredibly well. Dip them in tea or use them in tiramisu, trifle, charlotte cake and more.
Ingredients
3 large eggs, separated (see notes below), at room temperature
75 g granulated sugar
75 g all-purpose flour
Icing sugar for dusting
Directions
- On a piece of parchment paper, trace three strips of a width of about 7.5cm (3 inches), leaving a gap of at least 2.5cm (1 inch) between them. Flip the parchment paper (so the pen marks are on the back) and line a baking sheet with it.
- In a large mixing bowl, whip the egg whites on low speed until foamy.
- Start adding the sugar one tablespoon at a time and gradually increase the speed to medium-high.
- Stop whipping when you get to medium peaks that hold their shape but slightly tilt at the top.
- Slightly beat the egg yolks with a fork and add them to the whipped egg whites in one go. Beat on low speed for 1-2 seconds, just until combined.
- Sift the flour over the egg mixture and fold in gently using a spatula. Be careful not to deflate the batter.
- Fill a piping bag fitted with a plain round tip and pipe 7.5cm (3 inch) long ladyfingers, making sure to leave a gap of around 2.5cm (1 inch) between them.
- Sift icing sugar over the cookies and let them sit at room temperature for about 15 minutes. The icing sugar will dissolve into the ladyfingers.
- In the meantime, start preheating the oven to 200°C (392°F, conventional setting).
- Sift icing sugar over the ladyfingers one more time just before baking them to get a nice sugary crust. Place the rack in the bottom third of the oven (level 2 out of 5 for example) and bake for 9-10 minutes. The ladyfingers should have a light golden color and shouldn’t stick to your finger.
- Let cool for a minute and transfer the ladyfingers to a wire rack. Use an offset spatula to release them from the parchment paper if needed.
Notes
- Make-ahead tips: Ladyfingers can be stored at room temperature in an airtight container for up to 3 days. You can also freeze them in an airtight container for up to a month. Simply thaw them for 30 minutes at room temperature before using them.
- You will need 90 g of egg whites and 60 g of yolks which is about 3 large eggs. Separate the eggs while they are cold (it’s much easier) and let them warm up at room temperature.
- If you do not wish to wait 15 minutes (step 8), simply dust the ladyfingers twice at a 5 minute interval. In this case, you should preheat the oven before preparing the batter.
- Cap patissier (French pastry program) recipe found on pecher-mignon.fr.
Did you make this recipe?
Tag @wheelofbaking on Instagram and hashtag it #wheelofbaking
Like this recipe?
Follow me @wheelofbaking on Pinterest
Bibliography
1Suas, M. (2008). Advanced Bread and Pastry: A Professional Approach (1st ed.). Delmar Cengage Learning.